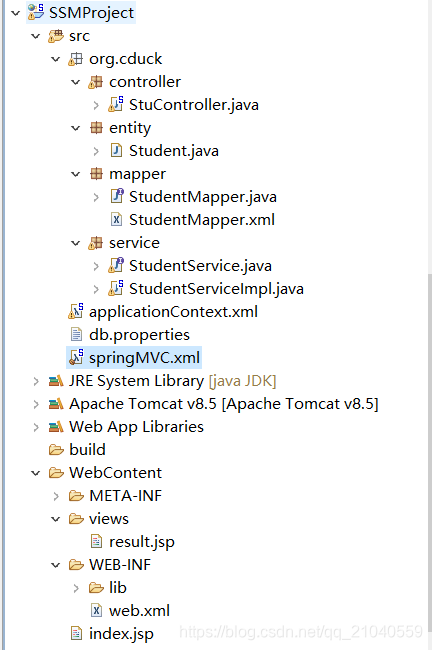
SSM整合
- Spring - MyBatis : 需要整合:将MyBatis的SqlSessionFactory 交给Spring
2
Spring - SpringMVC : 就是将Spring - SpringMVC 各自配置一遍

SM整合步骤:
思路:
SqlSessionFactory -> SqlSession ->StudentMapper ->CRUD
可以发现 ,MyBatis最终是通过SqlSessionFactory来操作数据库,
Spring整合MyBatis 其实就是 将MyBatis的SqlSessionFactory 交给Spring
1.jar
mybatis-spring.jar    spring-tx.jar    spring-jdbc.jar        spring-expression.jar
spring-context-support.jar    spring-core.jar        spring-context.jar
spring-beans.jar    spring-aop.jar    spring-web.jar    commons-logging.jar
commons-dbcp.jar    ojdbc.jar    mybatis.jar    log4j.jar    commons-pool.jar
2.类-表
Student类 -student表
3.-(与Spring整合时,conf.xml可省)–MyBatis配置文件conf.xml(数据源、mapper.xml) --可省,将该文件中的配置 全部交由spring管理
spring配置文件 applicationContext.xml
4.通过mapper.xml将 类、表建立映射关系
5.现在整合的时候,需要通过Spring管理SqlSessionFacotry ,因此 产生sqlSessionFacotry 所需要的数据库信息 需要放入spring配置文件中
6.使用Spring整合MyBatis :将MyBatis的SqlSessionFactory 交给Spring
applicationContext.xml:
<?xml version="1.0" encoding="UTF-8"?>
<beans xmlns="http://www.springframework.org/schema/beans"
    xmlns:xsi="http://www.w3.org/2001/XMLSchema-instance"
    xmlns:context="http://www.springframework.org/schema/context"
    xsi:schemaLocation="http://www.springframework.org/schema/beans http://www.springframework.org/schema/beans/spring-beans.xsd
        http://www.springframework.org/schema/context http://www.springframework.org/schema/context/spring-context-4.3.xsd">

<!-- 配置数据源、mapper.xml -->


<!-- 加载db.properties文件 -->
<bean id="config" class="org.springframework.beans.factory.config.PreferencesPlaceholderConfigurer">
    <property name="locations">
        <array>
            <value>classpath:db.properties</value>
        </array>
    </property>
</bean>
<!-- 配置数据库信息, -->
<bean id="dataSource" class="org.apache.commons.dbcp.BasicDataSource">
    <property name="url" value="${url}"></property>
    <property name="driverClassName" value="${driver}"></property>
    <property name="username" value="${username}"></property>
    <property name="password" value="${password}"></property>
</bean>


<!-- mapper.xml -->
<!-- 配置mybatis核心类SqlSessionFactory -->
<bean id="sqlSessionFactory" class="org.mybatis.spring.SqlSessionFactoryBean">
    <property name="dataSource" ref="dataSource"></property>

    <!-- 加载Mapper.xml文件 -->
    <property name="mapperLocations" value="classpath:org/cduck/mapper/*.xml"></property>
</bean>

<!-- Spring整合mybatis -->
 <bean id="mappers" class="org.mybatis.spring.mapper.MapperScannerConfigurer">
 <!-- 将mybatis的sqlSessionFactory交给Spring去管理 -->
         <property name="sqlSessionFactoryBeanName" value="sqlSessionFactory"></property>
               <!--name="basePackage"的属性的作用:将org.cduck.mapper包中所有的接口
               产生与之对应的动态代理对象(对象名就是首字母小写的接口名)。以便于操作mybatis
                     -->
              <property name="basePackage" value="org.cduck.mapper"></property>
     </bean>


<!-- =============================分割线============================= -->


<bean id="studentService" class="org.cduck.service.StudentServiceImpl">
    <property name="studentmapper" ref="studentMapper"></property>
    <!-- 注意:!! 这里的studentMapper在上面的<property name="basePackage" value="org.cduck.mapper"></property>
        已经将其放入了IOC容器,所以直接注入就行。
        但是studentmapper一直报错:因为这种方法是SET注入法,我的studentmapper没有写set方法所以报错
     -->
</bean>


</beans>
db.properties:
driver=com.mysql.cj.jdbc.Driver
url=jdbc:mysql://localhost:3306/mydb01?useUnicode=true&characterEncoding=utf-8&useSSL=false&serverTimezone = GMT
username=账号
password=密码
给web项目加入Spring支持:
web.xml
  <context-param>
    <param-name>contextConfigLocation</param-name>
    <param-value>classpath:applicationContext.xml</param-value>
  </context-param>
  <listener>
    <listener-class>org.springframework.web.context.ContextLoaderListener</listener-class>
  </listener>
SSM整合:
7.继续整合SpringMVC:将springmvc加入项目即可 :
a.加入SpringMVC需要的jar
spring-webmvc.jar
b.给项目加入SpringMVC支持
web.xml: dispatcherServlet
  <servlet>
    <servlet-name>springDispatcherServlet</servlet-name>
    <servlet-class>org.springframework.web.servlet.DispatcherServlet</servlet-class>
    <init-param>
      <param-name>contextConfigLocation</param-name>
      <param-value>classpath:springMVC.xml</param-value>
    </init-param>
    <load-on-startup>1</load-on-startup>
  </servlet>
  <servlet-mapping>
    <servlet-name>springDispatcherServlet</servlet-name>
    <url-pattern>/</url-pattern>
  </servlet-mapping>
c.编写springmvc配置文件:
springMVC.xml:视图解析器、基础配置
<?xml version="1.0" encoding="UTF-8"?>
<beans xmlns="http://www.springframework.org/schema/beans"
    xmlns:xsi="http://www.w3.org/2001/XMLSchema-instance"
    xmlns:mvc="http://www.springframework.org/schema/mvc"
    xmlns:aop="http://www.springframework.org/schema/aop"
    xmlns:context="http://www.springframework.org/schema/context"
    xsi:schemaLocation="http://www.springframework.org/schema/mvc http://www.springframework.org/schema/mvc/spring-mvc-4.3.xsd
        http://www.springframework.org/schema/beans http://www.springframework.org/schema/beans/spring-beans.xsd
        http://www.springframework.org/schema/context http://www.springframework.org/schema/context/spring-context-4.3.xsd
        http://www.springframework.org/schema/aop http://www.springframework.org/schema/aop/spring-aop-4.3.xsd">
<!-- 配置视图解析器 -->
<bean id="id" class="org.springframework.web.servlet.view.InternalResourceViewResolver">
    <property name="prefix" value="/views/"></property>
    <property name="suffix" value=".jsp"></property>
</bean>

<!-- springMVC 基础配置、标配 -->
<mvc:annotation-driven></mvc:annotation-driven>

<!-- 将控制器所在包纳入IOC容器 -->
<context:component-scan base-package="org.cduck.controller"></context:component-scan>
</beans>
具体代码见GitHub


